Setting up Tomcat Cluster for SpagoBI 5.1.
Setting up SpagoBI 5.1 on Tomcat with MySQL is in the previous post.
Details on Tomcat Clustering.
Objective
Create a Cluster of Tomcat running SpagoBI, so that we can have a redundant setup. We will be setting up
session based clustering as this is quick and easy.Setup Overview as below.
                             /--> spagobi-node-1
                            /--> spagobi-node-2
Apache (httpd)  -----[RoundRobin]----> spagobi-node-3
                            \--> spagobi-node-4
                             \--> spagobi-node-5
Configuration port information for each spagobi Instance.
We will be configuring all the instance on the same server, for this test.
NOTE : In a real environment we will have multiple servers, each hosting a single instance of
SpagoBI. In that case we will not need to do the below port distribution. SHUTDOWN AJP SSL
spagobi-node-1 8005 8009 8443
spagobi-node-2 8015 8019 8444
spagobi-node-3 8025 8029 8445
spagobi-node-4 8035 8039 8446
spagobi-node-5 8045 8049 8447
Create Multiple Instance of the existing tomcat.
We will be creating multiple instance of the same server in
/opt[ahmed@ahmed-server ~]# cd /opt/
[ahmed@ahmed-server opt]# cp -rf apache-tomcat-7.0.59 apache-tomcat-7.0.59-8019
[ahmed@ahmed-server opt]# cp -rf apache-tomcat-7.0.59 apache-tomcat-7.0.59-8029
[ahmed@ahmed-server opt]# cp -rf apache-tomcat-7.0.59 apache-tomcat-7.0.59-8039
[ahmed@ahmed-server opt]# cp -rf apache-tomcat-7.0.59 apache-tomcat-7.0.59-8049
[ahmed@ahmed-server opt]# mv apache-tomcat-7.0.59 apache-tomcat-7.0.59-8009
Here is how the new directories look like.
Updating server.xml file.
We will first update the base
8009 Instance and later copy to all other instances.vim /opt/apache-tomcat-7.0.59-8009/conf/server.xml
Setting up the SHUTDOWN port.
We will be setting the below port for each server for
SHUTDOWNspagobi-node-1 8005
spagobi-node-2 8015
spagobi-node-3 8025
spagobi-node-4 8035
spagobi-node-5 8045
Make the change in the tag as below.
<Server port="8005" shutdown="SHUTDOWN">
Here is how it looks on the
server.xml
Comment below tag as we will not be using this.
<!--
<Connector executor="tomcatThreadPool"
           port="8080" protocol="HTTP/1.1"
           connectionTimeout="20000"
           redirectPort="8443" />
-->
Here is how it looks for my setup.

Update spago_service_url and spago_host_url.
Change the server and host url to point to the server on port 80.
As all the services will be served from this port.
As all the services will be served from this port.
<Environment name="spagobi_service_url" type="java.lang.String" value="http://localhost:8080/SpagoBI"/>
<Environment name="spagobi_host_url" type="java.lang.String" value="http://localhost:8080"/>
Change to
ipaddress of the Server or locahost. <Environment name="spagobi_service_url" type="java.lang.String" value="http://10.10.18.94/SpagoBI"/>
<Environment name="spagobi_host_url" type="java.lang.String" value="http://10.10.18.94"/>
Her is how it looks like.

Setting AJP port.
Below are the ports which we will be setting for each server.
                AJP        SSL
spagobi-node-1    8009    8443
spagobi-node-2    8019    8444
spagobi-node-3    8029    8445
spagobi-node-4    8039    8446
spagobi-node-5    8049    8447
Here is how it would look for
spagobi-node-1, will need to do it for other instances as well.<Connector port="8009" URIEncoding="UTF-8" protocol="AJP/1.3" redirectPort="8443" />
Setting name for our node.
As stated above
AJP 8009, is spagobi-node-1 so we add jvmRoute="spagobi-node-1" to below tag.<Engine name="Catalina" defaultHost="localhost" jvmRoute="spagobi-node-1">
Here is how the
server.xml looks like.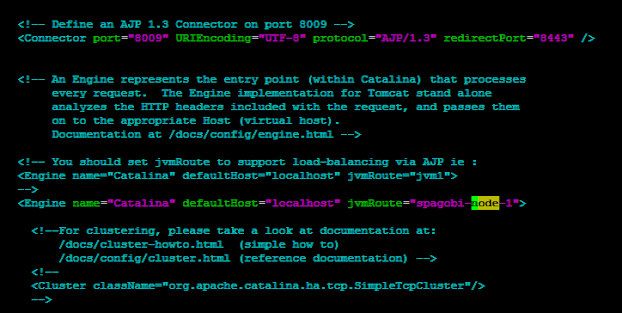
Making Changes to rest of the server.xml.
First lets copy
server.xml to all the other instance.cp /opt/apache-tomcat-7.0.59-8009/conf/server.xml /opt/apache-tomcat-7.0.59-80[1-4]9/conf/
cp /opt/apache-tomcat-7.0.59-8009/conf/server.xml /opt/apache-tomcat-7.0.59-80[123]9/conf/
cp /opt/apache-tomcat-7.0.59-8009/conf/server.xml /opt/apache-tomcat-7.0.59-8019/conf/
cp /opt/apache-tomcat-7.0.59-8009/conf/server.xml /opt/apache-tomcat-7.0.59-8029/conf/
Update
SHUTDOWN port on all the instance.sed -i -- 's/8005/8015/g' /opt/apache-tomcat-7.0.59-8019/conf/server.xml
sed -i -- 's/8005/8025/g' /opt/apache-tomcat-7.0.59-8029/conf/server.xml
sed -i -- 's/8005/8035/g' /opt/apache-tomcat-7.0.59-8039/conf/server.xml
sed -i -- 's/8005/8045/g' /opt/apache-tomcat-7.0.59-8049/conf/server.xml
Update
AJP port.sed -i -- 's/8009/8049/g' /opt/apache-tomcat-7.0.59-8049/conf/server.xml
sed -i -- 's/8009/8039/g' /opt/apache-tomcat-7.0.59-8039/conf/server.xml
sed -i -- 's/8009/8029/g' /opt/apache-tomcat-7.0.59-8029/conf/server.xml
sed -i -- 's/8009/8019/g' /opt/apache-tomcat-7.0.59-8019/conf/server.xml
Update
SSL port.sed -i -- 's/8443/8444/g' /opt/apache-tomcat-7.0.59-8019/conf/server.xml
sed -i -- 's/8443/8445/g' /opt/apache-tomcat-7.0.59-8029/conf/server.xml
sed -i -- 's/8443/8446/g' /opt/apache-tomcat-7.0.59-8039/conf/server.xml
sed -i -- 's/8443/8447/g' /opt/apache-tomcat-7.0.59-8049/conf/server.xml
Update
node-name for all the Instance. This is important as this will identify each instance.sed -i -- 's/node-1/node-2/g' /opt/apache-tomcat-7.0.59-8019/conf/server.xml
sed -i -- 's/node-1/node-3/g' /opt/apache-tomcat-7.0.59-8029/conf/server.xml
sed -i -- 's/node-1/node-4/g' /opt/apache-tomcat-7.0.59-8039/conf/server.xml
sed -i -- 's/node-1/node-5/g' /opt/apache-tomcat-7.0.59-8049/conf/server.xml
Configuring httpd Server.
Assuming
httpd is already installed. If not the execute sudo yum install httpd on centos.
Add the below configuration to
Location :
httpd.conf file in the end.Location :
/etc/https/conf/https.conf<Proxy balancer://spagobicluster stickysession=JSESSIONID>
BalancerMember ajp://127.0.0.1:8009 min=10 max=100 route=spagobi-node-1 loadfactor=1
BalancerMember ajp://127.0.0.1:8019 min=10 max=100 route=spagobi-node-2 loadfactor=1
BalancerMember ajp://127.0.0.1:8029 min=10 max=100 route=spagobi-node-3 loadfactor=1
BalancerMember ajp://127.0.0.1:8039 min=10 max=100 route=spagobi-node-4 loadfactor=1
BalancerMember ajp://127.0.0.1:8049 min=10 max=100 route=spagobi-node-5 loadfactor=1
</Proxy>
ProxyPass /* balancer://spagobicluster/*
[OPTIONAL] we can give the below configuration.
ProxyPass /SpagoBI balancer://spagobicluster/SpagoBI
ProxyPass /SpagoBIAccessibilityEngine balancer://spagobicluster/SpagoBIAccessibilityEngine
ProxyPass /SpagoBIBirtReportEngine balancer://spagobicluster/SpagoBIBirtReportEngine
ProxyPass /SpagoBIChartEngine balancer://spagobicluster/SpagoBIChartEngine
ProxyPass /SpagoBICockpitEngine balancer://spagobicluster/SpagoBICockpitEngine
ProxyPass /SpagoBICommonJEngine balancer://spagobicluster/SpagoBICommonJEngine
ProxyPass /SpagoBIConsoleEngine balancer://spagobicluster/SpagoBIConsoleEngine
ProxyPass /SpagoBIDataMiningEngine balancer://spagobicluster/SpagoBIDataMiningEngine
ProxyPass /SpagoBIGeoEngine balancer://spagobicluster/SpagoBIGeoEngine
ProxyPass /SpagoBIGeoReportEngine balancer://spagobicluster/SpagoBIGeoReportEngine
ProxyPass /SpagoBIJasperReportEngine balancer://spagobicluster/SpagoBIJasperReportEngine
ProxyPass /SpagoBIJPivotEngine balancer://spagobicluster/SpagoBIJPivotEngine
ProxyPass /SpagoBIMobileEngine balancer://spagobicluster/SpagoBIMobileEngine
ProxyPass /SpagoBINetworkEngine balancer://spagobicluster/SpagoBINetworkEngine
ProxyPass /SpagoBIQbeEngine balancer://spagobicluster/SpagoBIQbeEngine
ProxyPass /SpagoBISocialAnalysis balancer://spagobicluster/SpagoBISocialAnalysis
ProxyPass /SpagoBITalendEngine balancer://spagobicluster/SpagoBITalendEngine
ProxyPass /SpagoBIWhatIfEngine balancer://spagobicluster/SpagoBIWhatIfEngine
To add a
balancer-manager so that you can see the nodes add the below tag in the end of https.conf file.<Location /balancer-manager>
SetHandler balancer-manager
AuthType Basic
AuthName "Balancer Manager"
AuthUserFile "/etc/httpd/conf/.htpasswd"
Require valid-user
</Location>
Setting
passwd for balancer-manager is simple. Execute below command to create a password for balancer-manager.[ahmed@ahmed-server ~]# htpasswd -c /etc/httpd/conf/.htpasswd admin
Here is how
httpd.conf looks like.
Starting httpd Deamon.
Restarting
https using below command.[ahmed@ahmed-server ~]# service httpd restart
Starting tomcat Instances.
We are start all the instance at once using the below script.
for item in 8009 8019 8029 8039 8049;
do
    /opt/apache-tomcat-7.0.59-${item}/bin/start.sh
    sleep 100
done;
Once we have all the instance started, we can check the
balancer-manager on the url as http:/localhost/balancer-manager. Here is how it looks on current setup.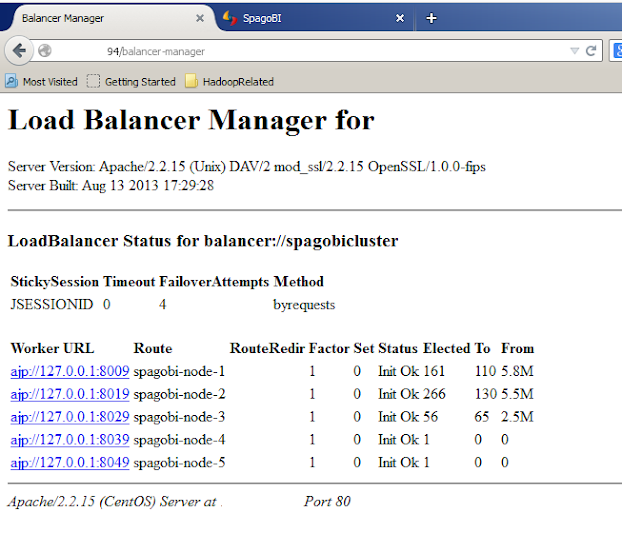
Comments
Post a Comment