SpagoBI Tomcat Clustering Using mod_jk and httpd on Centos - In-Memory Session Replication.
In an earlier post we did a basic
session based replication, but the session was not redundant.
Now we will be using
mod_jk from tomcat to do session based replication and these session are replicated on all the tomcat server.
We demonstrate configuration with
mod_jk rather than mod_proxy for two reasons: - It is a little more complex, and requires some additional steps, and it’s currently the more mature load balancing connector, with a wider user base in the Tomcat community.
- Additionally, while new releases of
mod_proxyare tied to Apache HTTPD releases,mod_jkis developed and released separately from Tomcat, so its features tend to be more current.
mod_jk is the Apache HTTPD module that will be used to provide our cluster with its load balancing and proxy capabilities. It uses the AJP protocol to facilitate fast communication between Tomcat servers and the Apache Web Server that will receive the client requests.
Installing apache-tomcat and httpd.
Extracting and renaming
apache-tomcat.[ahmed@ahmed-server ~]# tar xvzf apache-tomcat-7.0.59.tar.gz -C /opt
[ahmed@ahmed-server ~]# mv /opt/apache-tomcat-7.0.59.tar.gz /opt/apache-tomcat-7.0.59-8009
Creating a Second Instance. Will configure this to
8019 AJP Port[ahmed@ahmed-server ~]# cp -rf /opt/apache-tomcat-7.0.59-8009 /opt/apache-tomcat-7.0.59-8019
Installing
httpd and httpd-devel. We need the httpd-devel to build mod_jk in the next step.[ahmed@ahmed-server ~]# yum install httpd httpd-devel
Download and building from tomcat-connectors src mod_jk.
Download
tomcat-connector-src from the link.[ahmed@ahmed-server ~]# cd Downloads
[ahmed@ahmed-server Downloads]$ wget http://www.apache.org/dist/tomcat/tomcat-connectors/jk/tomcat-connectors-1.2.40-src.tar.gz
[ahmed@ahmed-server Downloads]$ tar xzf tomcat-connectors-1.2.40-src.tar.gz
[ahmed@ahmed-server Downloads]$ ls -l tomcat-connectors-1.2.40-src
total 64
drwxrwxr-x. 3 ahmed ahmed 4096 Mar 4 22:43 build
drwxr-xr-x. 2 ahmed ahmed 4096 Mar 4 22:57 conf
drwxr-xr-x. 10 ahmed ahmed 4096 Apr 11 2014 docs
-rw-r--r--. 1 ahmed ahmed 7819 Mar 31 2014 HOWTO-RELEASE.txt
drwxr-xr-x. 6 ahmed ahmed 4096 Apr 11 2014 jkstatus
-rw-r--r--. 1 ahmed ahmed 13597 May 4 2008 LICENSE
drwxr-xr-x. 9 ahmed ahmed 4096 Mar 4 22:54 native
-rw-r--r--. 1 ahmed ahmed 269 Jan 3 2014 NOTICE
-rw-r--r--. 1 ahmed ahmed 1238 Mar 18 2012 README.txt
drwxr-xr-x. 2 ahmed ahmed 4096 Apr 11 2014 support
drwxr-xr-x. 4 ahmed ahmed 4096 Apr 11 2014 tools
drwxr-xr-x. 9 ahmed ahmed 4096 Apr 11 2014 xdocs
[ahmed@ahmed-server Downloads]# cd tomcat-connectors-1.2.40/native/
Configuring
mod_jk code.[ahmed@ahmed-server native]$ ./configure --with-apxs=/usr/sbin/apxs
Next we build the code.
[ahmed@ahmed-server native]$ make
[ahmed@ahmed-server native]$ ls
aclocal.m4  buildconf.sh  config.log     configure     iis       Makefile.am  README.txt  TODO.txt
apache-1.3  BUILDING.txt  config.nice    configure.ac  libtool   Makefile.in  scripts
apache-2.0  common        config.status  docs          Makefile  netscape     STATUS.txt
Module
mod_jk.so is located in apache-2.0, our current server is version httpd 2.2.[ahmed@ahmed-server native]$ cd apache-2.0
[ahmed@localhost apache-2.0]$ ls -l mod_jk.so
-rwxrwxr-x. 1 ahmed ahmed 1161265 Mar 4 22:55 mod_jk.so
Now lets copy the compiled
module to httpd.sudo cp /home/ahmed/Downloads/tomcat-connectors-1.2.40-src/native/apache-2.0/mod_jk.so /usr/lib64/httpd/modules/
Copy
properties file.sudo cp /home/ahmed/Downloads/tomcat-connectors-1.2.40-src/conf/workers.properties /etc/httpd/conf/
Now we are ready to configure our
http.conf file.
Configuring mod_jk in httpd.conf.
Add the below configuration in the
/etc/httpd/conf/httpd.conf file after LoadModule# Load module
LoadModule jk_module /usr/lib64/httpd/modules/mod_jk.so
# Specify path to worker configuration file
JkWorkersFile /etc/httpd/conf/workers.properties
# Configure logging and memory
JkShmFile /var/log/httpd/mod_jk.shm
JkLogFile /var/log/httpd/mod_jk.log
JkLogLevel info
Add the below configuration end of the file in
httpd.conf.# Configure monitoring
JkMount /jkmanager/* jk-status
<Location /jkmanager>
Order deny, allow
Deny from all
Allow from localhost
</Location>
# Configure applications
JkMount /* balancer
Here’s a quick explanation of the parameters we just configured. courtesy
- LoadModule - this command makes the mod_jk module available for use. The extension of the module itself will vary by operating system.
- JkWorkersFile - sets the path to the worker configuration file, which we will create in the next step.
- JkShmFile - sets the path to the shared memory files for the module. Generally, you’ll want to keep this with the logs.
- JkLogFile - sets the path to the module log file.
- JkLogLevel - sets the level of logging for the module. The valid values for this attribute, in descending order by verbosity, are “debug”, “error” or “info”.
- JkMount - this is used to map a certain URL pattern to a specific worker configured in the worker configuration file. Here, we use it twice - once to enable /jkmanager as the access URL for jkstatus, a virtual monitoring worker, and once to map all requests we want to be handled by the cluster to the “lb” worker, a virtual worker that contains the load balancing capability
Location - this is a security constraint. The settings we have included allow access to the jkmanager only from the localhost (this is a Good Idea).
Configuring Cluster Workers in workers.properties.
Initial
Stats/Manager and setting balancer# Define two status worker:
# - jk-status for read-only use
# - jk-manager for read/write use
worker.list=jk-status
worker.jk-status.type=status
worker.jk-status.read_only=true
worker.list=jk-manager
worker.jk-manager.type=status
# We define a load balancer worker
# with name "balancer"
worker.list=balancer
worker.balancer.type=lb
Adding
spagobi-node-1 to the cluster.# Now we add members to the load balancer
# First member is "spagobi-node-1", most
# attributes are inherited from the
# template "worker.template".
worker.balancer.balance_workers=spagobi-node-1
worker.spagobi-node-1.reference=worker.template
worker.spagobi-node-1.host=localhost
worker.spagobi-node-1.port=8009
# Activation allows to configure
# whether this node should actually be used
# A: active (use node fully)
# D: disabled (only use, if sticky session needs this node)
# S: stopped (do not use)
# Since: 1.2.19
worker.spagobi-node-1.activation=A
Adding
spagobi-node-2 to the cluster.# Second member is "spagobi-node-2", most
# attributes are inherited from the
# template "worker.template".
worker.balancer.balance_workers=spagobi-node-2
worker.spagobi-node-2.reference=worker.template
worker.spagobi-node-2.host=localhost
worker.spagobi-node-2.port=8019
# Activation allows to configure
# whether this node should actually be used
# A: active (use node fully)
# D: disabled (only use, if sticky session needs this node)
# S: stopped (do not use)
# Since: 1.2.19
worker.spagobi-node-2.activation=A
Setting AJP Protocol for the template used above.
# Finally we put the parameters
# which should apply to all our ajp13
# workers into the referenced template
# - Type is ajp13
worker.template.type=ajp13
Configuring Tomcat Workers in server.xml.
We will first update the base
8009 Instance and later copy to all other instances.vim /opt/apache-tomcat-7.0.59-8009/conf/server.xml
Setting up the SHUTDOWN port.
We will be setting the below port for each server for
SHUTDOWNspagobi-node-1 8005
spagobi-node-2 8015
Make the change in the tag as below.
<Server port="8005" shutdown="SHUTDOWN">
Here is how it looks on the
server.xml
Comment below tag as we will not be using this.
<!--
<Connector executor="tomcatThreadPool"
           port="8080" protocol="HTTP/1.1"
           connectionTimeout="20000"
           redirectPort="8443" />
-->
Here is how it looks for my setup.

Setting AJP port.
Below are the ports which we will be setting for each server.
                AJP        SSL
spagobi-node-1    8009    8443
spagobi-node-2    8019    8444
Here is how it would look for
spagobi-node-1, will need to do it for other instances as well.
Setting name for our node.
As stated above
AJP 8009, is spagobi-node-1 so we add jvmRoute="spagobi-node-1" to below tag.<Engine name="Catalina" defaultHost="localhost" jvmRoute="spagobi-node-1">
Here is how the
server.xml looks like.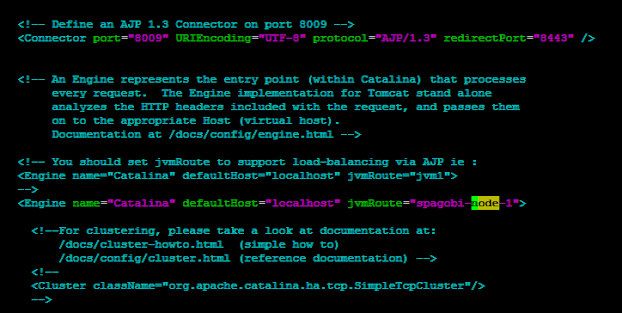
Make similar changes to
8019 and change ports accordingly.
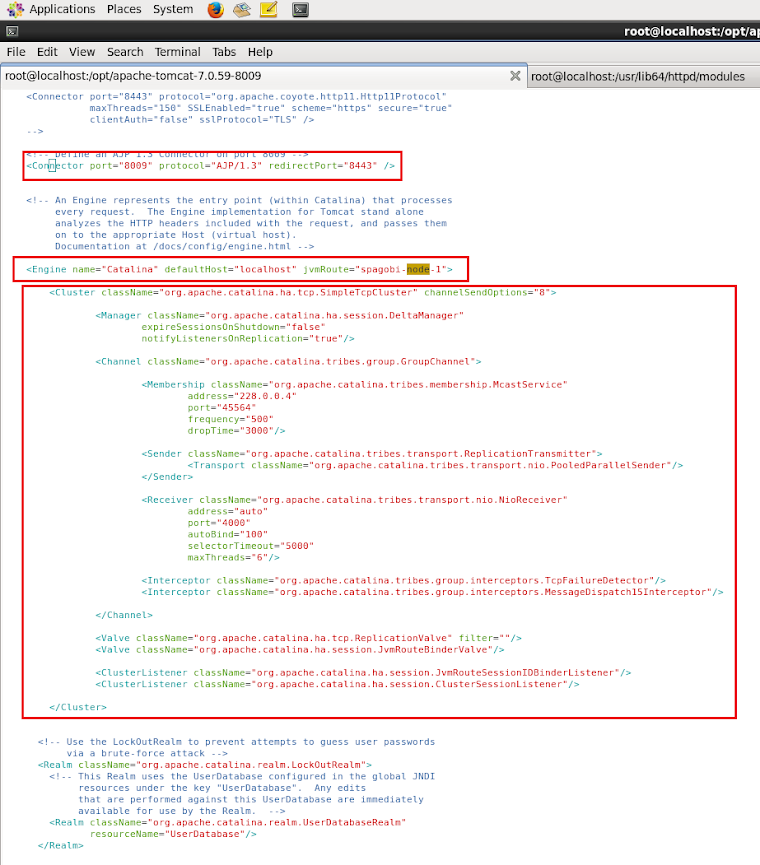
Adding Cluster Configuration <Cluster/>.
Add the below
<Cluster/> tag within <Engine/> tag : <Engine name="Catalina" defaultHost="localhost" jvmRoute="spagobi-node-1">
Here is the Cluster Tag.
<Cluster className="org.apache.catalina.ha.tcp.SimpleTcpCluster" channelSendOptions="8">

    <Manager className="org.apache.catalina.ha.session.DeltaManager"
        expireSessionsOnShutdown="false"
        notifyListenersOnReplication="true"/>

    <Channel className="org.apache.catalina.tribes.group.GroupChannel">

        <Membership className="org.apache.catalina.tribes.membership.McastService"
            address="228.0.0.4"
            port="45564"
            frequency="500"
            dropTime="3000"/>

        <Sender className="org.apache.catalina.tribes.transport.ReplicationTransmitter">
            <Transport className="org.apache.catalina.tribes.transport.nio.PooledParallelSender"/>
        </Sender>

        <Receiver className="org.apache.catalina.tribes.transport.nio.NioReceiver"
            address="auto"
            port="4000"
            autoBind="100"
            selectorTimeout="5000"
            maxThreads="6"/>

        <Interceptor className="org.apache.catalina.tribes.group.interceptors.TcpFailureDetector"/>
        <Interceptor className="org.apache.catalina.tribes.group.interceptors.MessageDispatch15Interceptor"/>

    </Channel>

    <Valve className="org.apache.catalina.ha.tcp.ReplicationValve" filter=""/>
    <Valve className="org.apache.catalina.ha.session.JvmRouteBinderValve"/>

    <ClusterListener className="org.apache.catalina.ha.session.JvmRouteSessionIDBinderListener"/>
    <ClusterListener className="org.apache.catalina.ha.session.ClusterSessionListener"/>

</Cluster>
Details about the
tags Above. courtesyEngine
This is the standard Engine element that defines Catalina as the component responsible for processing requests. As we mentioned in Step 5a, to enable session replication, you must set the “jvmRoute” attribute to match the corresponding worker you have configured in mod_jk’s workers.properties file. This value must be unique for every node included in the cluster.
Cluster
This is the main Cluster element, within which all other clustering elements are nested. It supports a variety of attributes, but in this simple example, we have only configured one, “channelSendOptions”. This attribute sets a flag within Tomcat’s clustering class that chooses between different methods of cluster communication. These options are outside the scope of this article, but a safe default setting is “8”, which enables asynchronous communication.
Manager
This is the standard element that Tomcat uses for session management. When nested inside the Cluster element, it is used to tell Tomcat which cluster-aware session manager should be used for session replication. In this example, we have used the DeltaManager, which provides basic cluster-aware session management, as well as additional capabilities you can use to divide your cluster into multiple groups in the future. The attributes we have configured, “expireSessionsOnShutdown” and “notifyListenersOnReplication”, have been configured to prevent a failing node from destroying sessions on other clustered nodes and explicitly notify the ClusterListeners when a session has been updated.
Channel
This element communicates with a component of Tomcat’s clustering solution called Tribes. This component handles all communication between the clustered nodes. In this example, we have configured Tribes to use multicast communication, although more complicated situations can be configured using single point broadcasting. The Channel element is used to contain a series of other elements that divide cluster communication into simple blocks.
Membership
This Tribes-related element defines the address all nodes will use to keep track of one another. The settings we have used here are the Tribes defaults.
Sender
This Tribes-related element, in conduction with the Transport element nested inside of it, is used to choose from and configure a number of different implementations of cluster communication. Here, we have used the NIO transport, which generally provides the best performance.
Receiver
This Tribes-related element configures a single Receiver component, which receives messages from other nodes’ Sender components. The attributes of the element allow you to specify addresses, buffer sizes, thread limits, and more. The settings we have used here allow the nodes to automatically discover one another via an address that Tribes will generate automatically.
Interceptor
Interceptor elements are used to make modifications to messages sent between nodes. For example, one of the Interceptor elements we have configured here detects delays that may be preventing a member from updating its table due to timeout, and provides an alternative TCP connection. Tribes includes a number of standard interceptors; to enable any of them, simply add an addition Interceptor element with the appropriate className. Here, we have included only interceptors useful in almost all clustering situations.
Valve
Tomcat’s standard Valve element can be nested within Cluster elements to provide filtering. The element includes a number of cluster-specific implementations. For example, one of the Valves we have included here can be used to restrict the kinds of files replicated across the cluster. For this example configuration, we have included the most commonly used Valves, with blank attribute values that you can configure as required.
ClusterListener
This element listens to all messages sent through by cluster workers, and intercepts those that match their respective implementation’s specifications. These elements operate in a very similar manner to Inteceptor elements, except that rather than modifying messages and passing them on to a Receiver, they are the intended recipient of the messages for which they are listening.
Here is how the End Configuration Looks like.
Starting Servers.
Start Tomcat.
/opt/apache-tomcat-7.0.59-8009/bin/startup.sh
/opt/apache-tomcat-7.0.59-8019/bin/startup.sh
Start httpd.
service httpd start
Checking on Browser.
Start Using SpagoBI Application. Browser goto
http://localhost/SpagoBI to go to SpagoBI UI.
Checking Status. Goto URL
http://localhost/jkmanager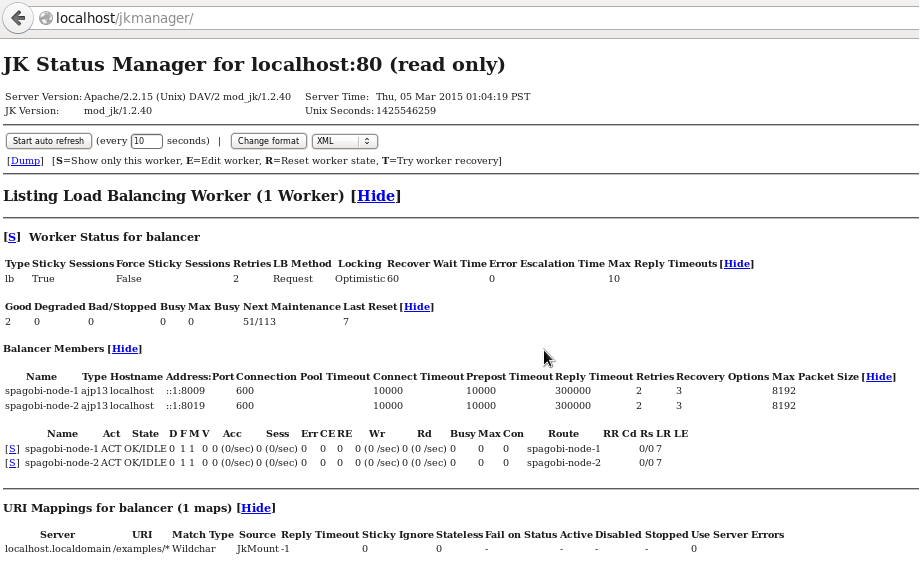
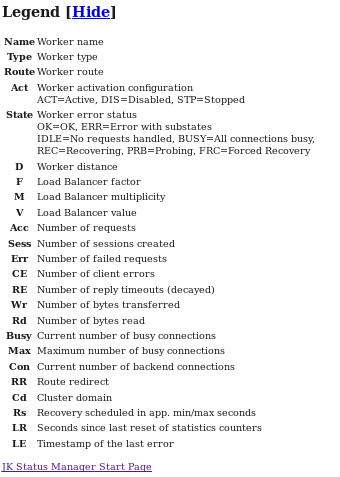
Details about the Legends in the Above JK Manager.
Comments
Post a Comment